

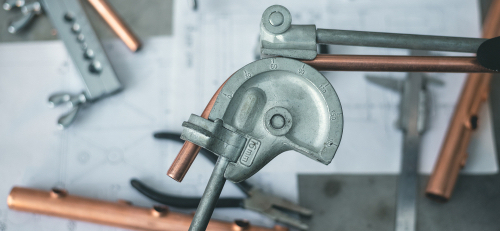
Manual pipe benders are hand-operated mechanical tools designed to create precise bends and curves in tubes and pipes. They work by applying controlled force through a handle to shape copper, stainless steel, cast iron, and aluminum piping without the need for any electrical power source.
These benders are perfect for on-site use where electricity may not be available. Even beginners and DIY enthusiasts can learn to use them with very little training. This comprehensive guide walks through the various types of manual pipe benders, their construction, how to operate them, real-world applications, and the key benefits and limitations you should know about.
Explore Our Pipe & Tube Processing Equipment
Premium tools built for professionals and serious DIY operators.
Sumner ST-401 Grasshopper Pipe DollyTypes of Manual Pipe Benders
There are several categories of hand-operated pipe-bending tools, each engineered for specific pipe materials, sizes, and bending tasks. Below is an overview of the most widely used varieties:
Dual Pipe Bender
The most common type — ideal for general bending tasks.
Ergonomic Pipe Bender
Curved handles for reduced effort and fatigue.
Mini & Micro Benders
For very small diameter pipes down to 3 mm.
Conduit Pipe Bender
Specialized for electrical conduit tubing.
Ratchet Pipe Bender
Uses ram bending for 90° bends on 10–32 mm pipes.
Free-Standing Bender
Large-format bender for heavy-duty pipe work.
⚙ Understanding the Bending Mark
Throughout this guide, you will encounter references to aligning the mark on the pipe. This mark indicates the exact point where the bend will begin. It is typically drawn with a marker all the way around the pipe's circumference so it remains visible no matter how the pipe is rotated during the bending process.
Dual Pipe Bender
Thanks to its straightforward design, the dual pipe bender is the most popular choice among manual benders. Its performance relies on the physical strength of the operator, and it works best with softer metals such as aluminum, copper, and plastic piping. With enough force, it can also handle steel and cast iron.
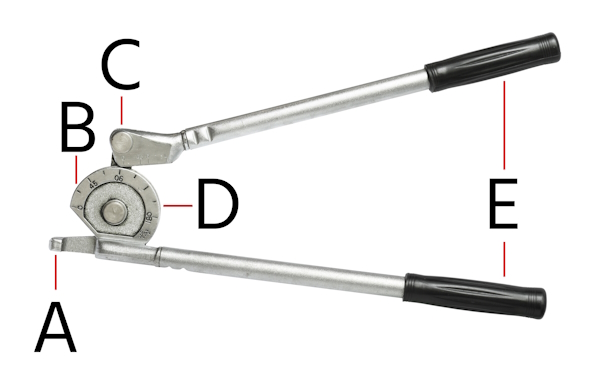
The main components of a dual pipe bender include: the holding clamp (secures the pipe), the former (shapes the bend), handle angle markers (indicate bend degree on the handle), former angle markers (corresponding degree indicators on the former), and the handles (provide leverage for bending).
How to Operate a Dual Pipe Bender
Separate the handles to open the bender fully.
Seat the pipe onto the former and lock it in place using the holding clamp. Close the handles to support the pipe firmly.
Verify that the 0 handle angle mark is aligned with the 0 former angle mark.
Slide the pipe so that the bending mark on the pipe lines up with the desired angle on the handle markers.
Apply force to bend the pipe until the 0 mark on the handle meets the target angle mark on the former.
Separate the handles once more and remove the finished bent pipe from the former.
Reading the Angle Markers
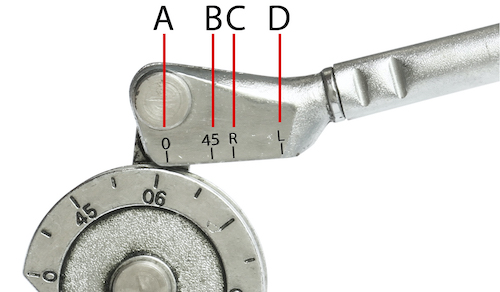
The bend angle is controlled by monitoring the former's angle markers. For instance, achieving a 90° bend means applying force until the handle's 0 marker reaches the 90 position on the former. The user aligns the pipe's bending mark with specific handle marks depending on the bend needed:
0
Align the 0 on the handle with the 0 on the former before starting.
45
Align the bending mark on the pipe with the 45 mark for a 45° bend.
R
Use the R marker for bends exceeding 90 degrees.
L
Align with the L marker to produce a standard 90° bend.
Ergonomic Pipe Bender
The ergonomic pipe bender shares the same fundamental design as the dual version, with one significant improvement: its handles are longer and gently curved. This ergonomic shape distributes force more effectively, meaning the operator needs to exert less physical strength to achieve the same bend angle. For professionals who bend pipe regularly, this design helps reduce strain and fatigue over the course of a workday.
Mini and Micro Pipe Benders
When standard dual benders are too large for the job, mini and micro pipe benders step in. These compact tools are built for very small-diameter pipes that larger benders simply cannot accommodate.
Mini Pipe Bender
Designed for pipes with diameters of 6 to 10 mm.
Micro Pipe Bender
Designed for pipes with diameters of 3 to 6 mm.
Despite their smaller size, mini and micro benders share the same core components — a former, holding clamp, and angle markers — and are operated in exactly the same way as their larger dual-bender counterparts.
Conduit Pipe Bender
Conduit benders are purpose-built manual tools for shaping electrical conduit — the protective tubing that houses cables and wires. Their construction differs from dual benders in several important ways:
Handle: Conduit bender handles measure either 96.5 cm (38 in) or 111.8 cm (44 in). The longer version provides additional leverage needed for bending tougher materials like steel conduit.
Former: Available in multiple sizes to match various EMT and rigid conduit diameters.
Hook: Located at the end of the former, the hook grips the conduit firmly during the bending operation.
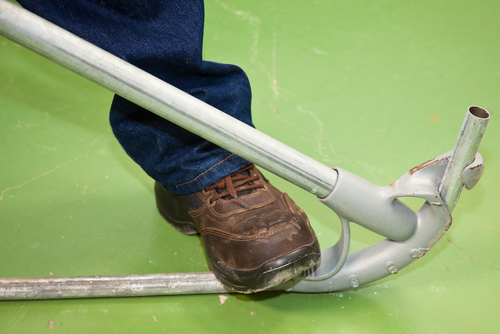
Heel: On the opposite end from the hook, the heel serves as a foot-press point. The operator steps down on it to help stabilize and apply additional bending force.
General Conduit Bending Steps
When possible, anchor the conduit to the floor to prevent it from sliding.
Position the former on the conduit so the pipe threads through the hook.
Step down firmly on the conduit with your foot, applying steady and consistent pressure to hold the pipe against the former.
Use the handle as leverage and pull until the bend reaches the desired angle.
Ratchet Pipe Bender
Ratchet pipe benders are engineered for producing 90° bends in pipes with diameters ranging from 10 to 32 mm. Much like hydraulic benders, the ratchet model uses a ram bending technique: the former presses directly into the pipe, which is supported on either side by two stationary pins. To advance the former, the operator simply pulls the ratchet lever on the tool's body.
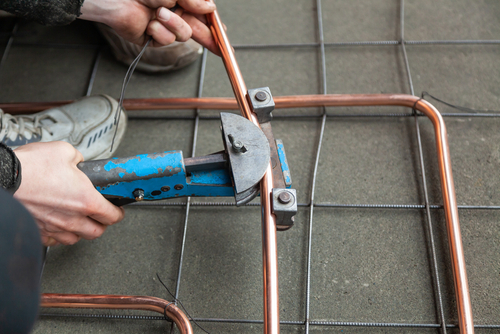
Free-Standing Pipe Bender
Free-standing benders are significantly larger and more robust than handheld models, making them the go-to choice for bending larger-diameter or heavier-gauge pipes. Their key components include:
Former: Interchangeable formers in various diameters to match different pipe sizes.
Handle: A large handle with a roller on one end bends the pipe as the user pulls it down. Both hands are typically needed for adequate force.
Guide: Positioned above the pipe, the guide prevents the pipe from being crushed during the bend.
Legs: Two sturdy legs provide a stable base for the entire unit.
Extra Formers: Free-standing models typically ship with multiple formers for handling a range of pipe diameters.
How to Use a Free-Standing Pipe Bender
Install the former that matches the pipe diameter you intend to bend.
Place the pipe on top of the former and secure it with the holding clamp.
Position the guide between the pipe and the roller at the end of the handle.
Pull the handle downward to bend the pipe to the required angle.
Raise the handle to release and remove the finished pipe.
Common Applications of Manual Pipe Benders
Manual pipe bending machines can shape tubes for roll cages, furniture frames, decorative fixtures, and much more. They work with a wide variety of metals including copper, brass, stainless steel, titanium, aluminum, and carbon steel. Industries and applications that rely on these tools include:
Food Industry Equipment
Scooter & Motorbike Parts
Exhaust Systems
Diesel Fuel Pipes
Home Furnishings
Handles & Railings
Railway Infrastructure
Ships, Boilers & Bridges
Advantages of Manual Tube Benders
When compared to their hydraulic and electric counterparts, manual pipe benders are generally more affordable, more compact, easier to transport, and far simpler to operate. Additional benefits include:
Easy for anyone to learn and operate
Straightforward, durable construction
No coolants or hydraulic fluids needed
Powered entirely by mechanical effort
Lower upfront and maintenance costs
Zero electricity consumption
Perfect for home workshops and DIY projects
Disadvantages of Manual Tube Benders
While manual benders offer many practical benefits, there are some inherent limitations to be aware of:
Demand more physical effort than hydraulic or electric models
Cannot be programmed for automated bending
Results vary based on operator strength
Less durable over time compared to hydraulic systems
Struggle to achieve precision on large or thick-walled pipes
Frequently Asked Questions
Is there a difference between a pipe bender and a tube bender?
In practice, there is no meaningful distinction. A tool designed to bend tubes can also bend pipes, and vice versa. The only exception arises when the pipe or tube diameter falls outside the tool's rated size range.
What are the four main methods of tube bending?
Tube bending techniques are generally classified into four categories: compression bending, mandrel tube bending, roll bending, and rotary draw bending. Each method has its own strengths depending on the material, pipe size, and the precision required.
What issues can occur during pipe bending?
The most common problems are flattening on the outer radius and wrinkling or buckling on the inner radius of the bend. Using a wiper die during the process can greatly reduce both buckling and wrinkling.
Why choose a pipe bender over a bending spring?
A pipe bender features graduated angle markings that allow for precise and repeatable bends, something a bending spring cannot offer. Additionally, prolonged use of a bending spring can place excessive stress on the operator's knees, making a proper pipe bender the safer and more ergonomic option for regular work.
Ready to Upgrade Your Pipe Handling Gear?
Browse our selection of professional-grade pipe and tube processing equipment at Backyard Provider.
Sumner ST-401 Grasshopper Pipe Dolly© Backyard Provider — Your Trusted Source for Outdoor & Construction Equipment