

There's something deeply satisfying about gathering family and friends around a table you built with your own hands. This guide walks you through constructing a classic picnic table from scratch — a timeless addition to any backyard. Whether you're a seasoned woodworker or picking up power tools for the first time, these step-by-step instructions will have you dining outdoors in no time.
What You'll Need: Tools
Materials List
• 10 x lengths of 50mm (thick) x 150mm (wide) x 1800mm (long) SA Pine
• 6 x lengths of 50mm (thick) x 100mm (wide) x 1800mm (long) SA Pine
• 4 x 10mm x 90mm carriage bolts and nuts with 25mm washers
• 50mm brass wood screws
• 65mm brass wood screws, 25mm nails
First, Build the Frame
Cut the Legs
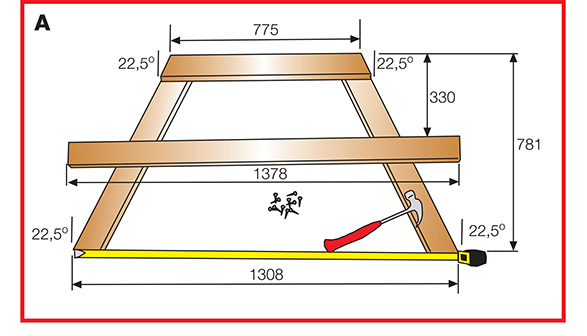
Take the 50 x 150 timber and cut four legs to a height of 760mm. Each leg should have angled cuts of 20.5 degrees at both the top and bottom. The actual measured length will be longer than 760mm — lay the pieces flat on a surface and mark the dimensions carefully before cutting.
Shape the Top A-Frame Braces
From your 50 x 100 stock, cut two top A-frame braces at 775mm in length. Both ends should be cut at 20.5 degrees to match the angle of the legs.
Cut the Lower Cross Braces
Using the same 50 x 100 material, cut two lower seat-level cross braces at 1370mm long with square ends on each side.
Assemble the A-Frames
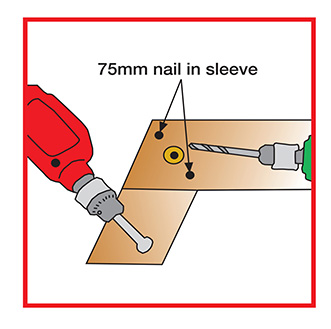
Arrange the two A-frames according to your diagram dimensions. Lay all the components on a flat surface to confirm that every measurement is correct. Fasten each joint with 75mm screws or 75mm galvanised nails — place two nails or screws at every crossing point. These joints need to be strong, so take your time ensuring a snug, solid connection.
Drill for Bolts
Use your 65mm spade bit to drill deep enough to recess the bolt heads on each side. This ensures the bolt sits flush and nothing catches or snags. Then drill a clean hole through both timber sections using an 8mm bit.
Bolt It Together
Insert a 10 x 90mm galvanised carriage bolt through each drilled hole. Place 25mm washers and nuts on the other side and tighten each one firmly. Repeat for the second A-frame assembly.

Attach the Bench Seats
Position the Bench Boards
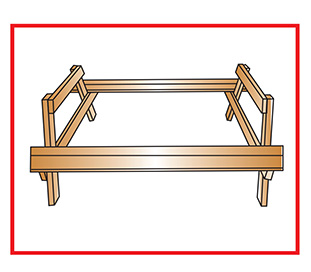
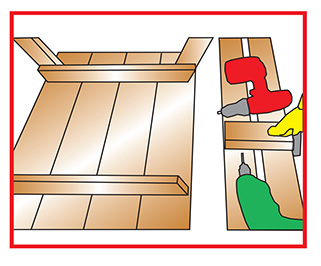
Select 50 x 100 timber cut to 1800mm for the bench planks. Using 75mm brass wood screws, secure two of these planks on each side of the protruding lower brace support to form the seating surface.
Ensure Even Spacing
Countersink all screw holes for a clean finish. Make sure each board extends about 80mm beyond the support on either end. Maintain a consistent gap of roughly 10mm between the two seat boards.
Construct the Table Top
Stand the Table Upright
Carefully stand the table on its legs. Take five pieces of 50mm x 150mm boards at 1800mm long and, using 38mm brass wood screws, attach them to the top braces of the A-frame. Countersink every screw hole.
Square It Up
The boards should overhang by about 200mm on each side of the top brace. Use your set square to confirm the tabletop boards are aligned perfectly. Keep in mind that the two outermost boards will extend approximately 15mm past the edges of the inner A-frame top brace.
Add the Support Braces
Fit the Underside Table Braces
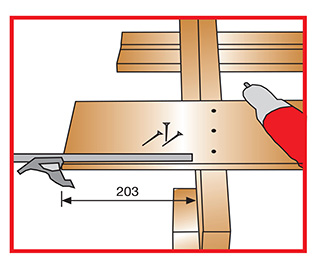
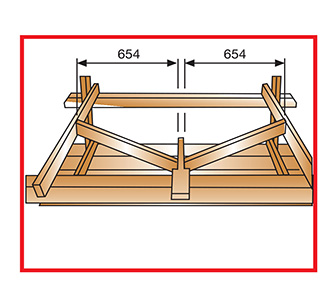
From the 50mm stock, cut a single underside tabletop brace at 650mm with 22.5-degree angles on both ends. Position and hold this brace in the centre of the table top using clamps. Screw through from the top surface using 50mm brass wood screws, then countersink all holes. Now flip the table over. Cut two seat braces from the 50 x 100 material at 250mm long and fix them in position using 65mm brass screws from the underside. Countersink everything.
Prepare the Angled Braces
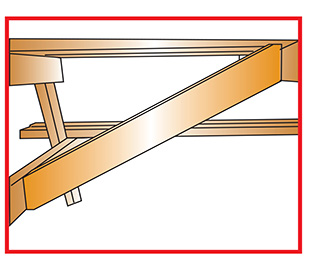
From the 50 x 100mm stock, cut two butterfly-style angle braces at 1160mm as shown. Each end should be cut at 45 degrees. The gap between the two shorter segments should be approximately 680mm. On each end tip of the angled cut, remove roughly 75mm of material and cut at 90 degrees to the angle base.
Secure the Angle Braces
Fit these angled and notched braces to the underside of the table. They should span the area between the A-frame bottom brace and the centre brace beneath the tabletop. Fasten each one using 65mm brass wood screws.
Finishing Touches
Your picnic table is now fully assembled. Give it a thorough sanding, paying attention to edges and surfaces where people will sit and rest their arms. Fill any remaining screw holes or small gaps with wood filler and let it dry completely. Apply a quality outdoor primer followed by two coats of exterior paint or wood stain in the colour of your choice.
Take a seat — you've earned it.
Prefer a Ready-Made Solution?
Skip the Sawdust — Start With a Steel Frame
If building from scratch isn't your style, our heavy-duty steel picnic table frame kit gives you a rock-solid foundation. Just add your own boards and you're good to go.
Pilot Rock Steel Picnic Table Kit