

The Cornerstone of Any Workshop
No tool commands a workshop quite like the table saw. Whether you're building furniture, framing, or fine woodworking, a table saw delivers the kind of precision and repeatability that hand tools simply cannot match. For beginners, stepping up to a table saw is a milestone — one that unlocks a whole new category of project possibilities.
This guide will walk you through every essential aspect: understanding the machine, selecting the right type for your needs, making clean and accurate cuts, and above all, doing it safely.

What Is a Table Saw?
A table saw consists of a circular blade mounted on an arbor driven by an electric motor, projecting upward through a slot in a flat table surface. The workpiece is fed across the table and into the blade, guided by either a fence or a mitre gauge. This fixed, stable setup gives you an unmatched degree of control compared to handheld saws.
The blade height and angle are both adjustable, allowing you to make straight cuts, angled cuts, and dadoes with consistent accuracy across dozens of repeated passes.

Types of Table Saws
Table saws come in several distinct categories. Understanding the differences will help you choose the right tool for your workspace and the work you intend to do.
| Type | Best For | Key Advantage |
|---|---|---|
| Jobsite / Portable | Contractors, site work, small workshops | Lightweight and easy to transport |
| Benchtop | Hobbyists, small spaces | Compact footprint, low cost |
| Hybrid | Serious home woodworkers | Balance of power and affordability |
| Cabinet Saw | Professional shops | Maximum power and precision |
For most beginners, a jobsite or hybrid saw offers the best entry point — enough power for real projects, without the floor space and budget demands of a full cabinet saw.
Key Components Explained
The Rip Fence
The rip fence runs parallel to the blade and acts as a guide when making rip cuts. A quality fence locks down firmly and stays perfectly parallel — any flex or drift in the fence will throw your cut off. Always check fence alignment before starting a session.
The Mitre Gauge
Used for cross cuts and angled cuts across the width of the board, the mitre gauge slots into a channel machined into the table. It pivots to allow cuts at angles other than 90°. Many woodworkers upgrade to an aftermarket mitre gauge or a dedicated crosscut sled for greater accuracy.

Blade Guard & Splitter
The blade guard covers the top of the blade during cutting, while the splitter (or riving knife) sits directly behind the blade to keep the kerf open and prevent the wood from pinching. Never remove the riving knife when making through-cuts — it is your primary protection against dangerous kickback.
Anti-Kickback Pawls
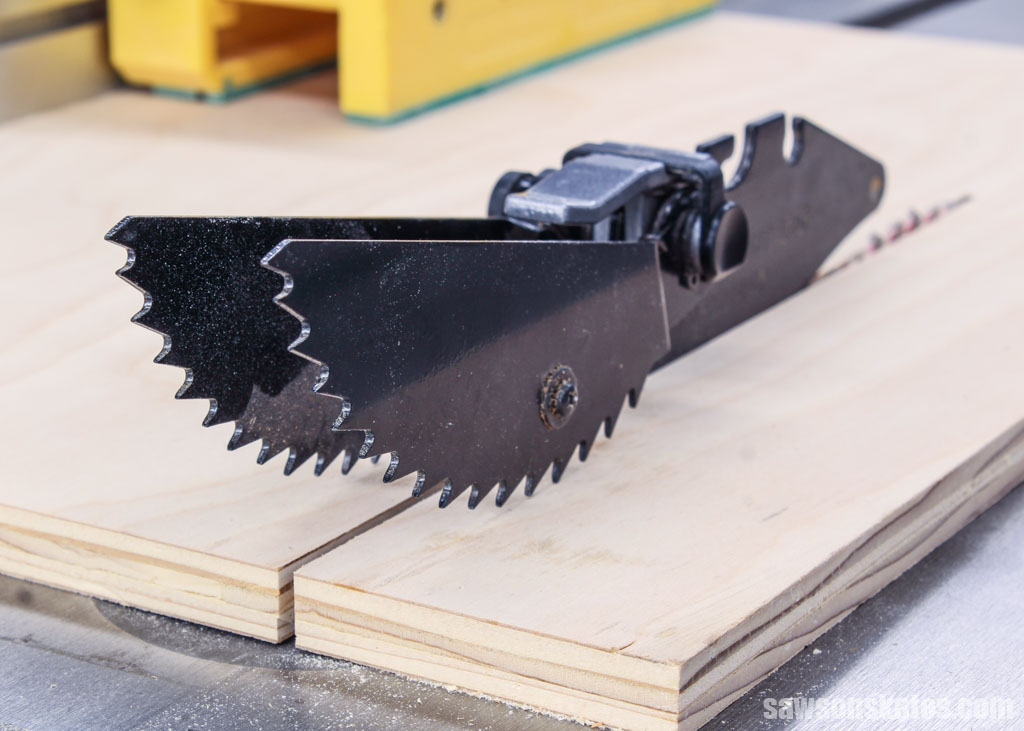
These small toothed fingers grip the workpiece and allow it to travel forward through the blade, but resist any backward movement. They work in conjunction with the riving knife to dramatically reduce kickback risk. Keep them sharp and in place whenever the guard assembly is fitted.
The Fence & Rail System
Better saws feature an extruded aluminium fence riding on a precision rail system. This design keeps the fence perfectly parallel through its entire range of movement and locks with a single lever. If you're buying a budget saw, the fence is the component most worth upgrading first.
Choosing the Right Blade
The blade is ultimately responsible for cut quality. Tooth count, geometry, and kerf width all affect the finish, speed, and appropriate material for each cut.
A dull blade is more dangerous than a sharp one. Increased cutting resistance causes the motor to bog down and raises kickback risk. Inspect your blade regularly and replace or sharpen it when the teeth become visibly rounded or the cut quality drops.
Cuts That Create Joinery
One of the most rewarding capabilities of a table saw is its ability to produce the cuts needed for strong, traditional woodworking joints. Here are four of the most commonly used:

A projecting tongue fits into a matching groove — widely used in flooring, panelling, and cabinet backs for a flush, strong connection.

One of woodworking's oldest joints. The tenon cut on the table saw fits into a mortise to create exceptionally strong frames and legs.

Two angled pieces meet at a corner — commonly used in frames, boxes, and trim. The blade tilt and mitre gauge work in combination to achieve this cut.

Interlocking rectangular fingers create enormous glue surface area and mechanical strength, ideal for box corners and drawer construction.
Rip Cutting vs. Cross Cutting
The two fundamental cuts in woodworking follow different paths through the material and require different setup on the saw.
Rip Cutting
Cutting parallel to the wood grain, typically to reduce a wide board to a narrower width. Always use the rip fence — never attempt rip cuts freehand. Feed the board steadily with both hands positioned well away from the blade, and use a push stick for narrow pieces.
Cross Cutting
Cutting across the grain to shorten the length of a board. Use the mitre gauge or a crosscut sled — never the rip fence alone for cross cuts, as this can trap the offcut between the blade and fence, causing dangerous kickback. A sled provides the most controlled and repeatable results.

Safety Rules You Must Know
A table saw demands respect. The blade spins at thousands of RPM and can cause severe injury in a fraction of a second. These rules are non-negotiable, whether you are a beginner making your first cut or a seasoned woodworker.

- Always wear safety glasses or a face shield
- Use hearing protection during extended sessions
- Keep the blade guard and riving knife fitted at all times
- Never reach over or behind a spinning blade
- Use a push stick for rips narrower than 150mm
- Stand to the side of the blade, never directly behind it
- Disconnect power before changing blades or clearing jams
- Keep the table surface and floor clear of off-cuts
- Never operate the saw under the influence of medication or fatigue
- Feed workpieces against the blade rotation — never backwards
Kickback — where the workpiece is violently thrown back toward the operator — is the most common cause of table saw injuries. The riving knife, anti-kickback pawls, and correct feeding technique are your three layers of protection. Never disable any of them.
Whether you're tackling hardwood joinery or heavy-duty material cutting, the right saw makes all the difference. Check out the Evolution S355MCS — a powerful mitering chop saw built for precision and durability on demanding cuts.
Start Simple, Build Confidence
Every master woodworker started with a first cut. The table saw rewards patience and preparation — spend time dialling in your fence, use sharp blades, follow the safety rules every single time, and the results will follow. Begin with straightforward rip cuts and crosscuts, then gradually explore dadoes, bevels, and joinery as your confidence grows.
A well-set-up table saw is one of the most satisfying tools in the workshop. Treat it with care and it will be the cornerstone of your projects for years to come.